Creating and running programs
Now that you’ve set up your computer and EV3 Brick, you’re ready to start writing programs.
To make it easier to create and manage your programs, let’s first have a quick look at how MicroPython projects and programs for your EV3 robots are organized.
Programs are organized into project folders, as shown in Figure 8. A project folder is a directory on your computer that contains the main program (main.py) and other optional scripts or files. This project folder and all of its contents will be copied to the EV3 Brick, where the main program will be run.
This page shows you how to create such a project and how to transfer it to the EV3 Brick.

Figure 8 A project contains a program called main.py and optional resources like sounds or MicroPython modules.
Creating a new project
To create a new project, open the EV3 MicroPython tab and click create a new project, as shown in Figure 9. Enter a project name in the text field that appears and press Enter. When prompted, choose a location for this program and confirm by clicking choose folder.

Figure 9 Creating a new project. This example is called getting_started, but you can choose any name.
When you create a new project, it already includes a file called main.py. To see its contents and to modify it, open it from the file browser as shown in Figure 10. This is where you’ll write your programs.
If you are new to MicroPython programming, we recommend that you keep the existing code in place and add your code to it.

Figure 10 Opening the default main.py program.
Opening an existing project
To open a project you created previously, click File and click Open Folder, as shown in Figure 11. Next, navigate to your previously created project folder and click OK. You can also open your recently used projects using the Open Recent menu option.
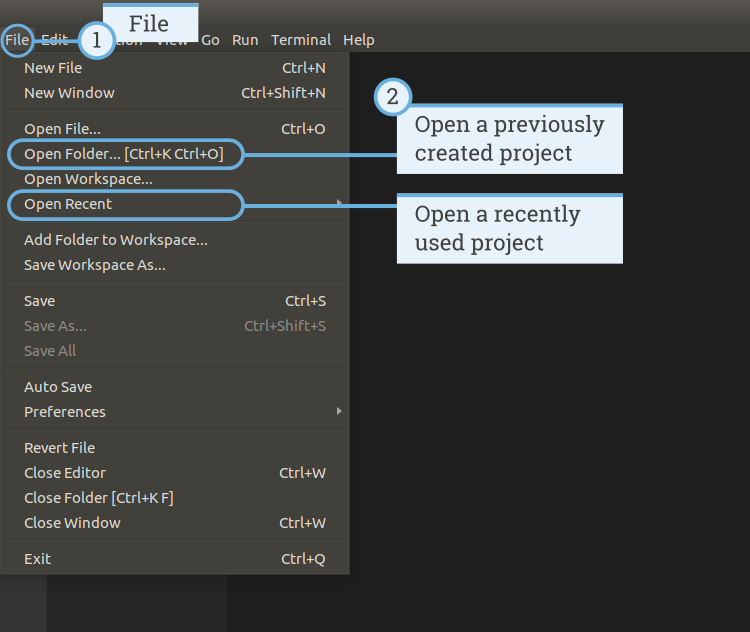
Figure 11 Opening a previously created project.
Connecting to the EV3 Brick with Visual Studio Code
To be able to transfer your code to the EV3 Brick, you’ll first need to connect the EV3 Brick to your computer with the mini-USB cable and configure the connection with Visual Studio Code. To do so:
- Turn the EV3 Brick on
- Connect the EV3 Brick to your computer with the mini-USB cable
- Configure the USB connection as shown in Figure 12.

Figure 12 Configuring the USB connection between the computer and the EV3 Brick
Downloading and running a program
You can press the F5 key to run the program. Alternatively, you can start it manually by going to the debug tab and clicking the green start arrow, as shown in Figure 13.
When the program starts, a pop-up toolbar allows you to stop the program if necessary. You can also stop the program at any time using the back button on the EV3 Brick.
If your program produces any output with the print command, this is shown in the output window.

Figure 13 Running a program
Expanding the example program
Now that you’ve run the basic code template, you can expand the program to make a motor move. First, attach a Large Motor to Port B on the EV3 Brick, as shown in Figure 14.

Figure 14 The EV3 Brick with a Large Motor attached to port B.
Next, edit main.py to make it look like this:
#!/usr/bin/env pybricks-micropython
from pybricks.hubs import EV3Brick
from pybricks.ev3devices import Motor
from pybricks.parameters import Port

# Create your objects here

# Initialize the EV3 Brick.
ev3 = EV3Brick()

# Initialize a motor at port B.
test_motor = Motor(Port.B)

# Write your program here

# Play a sound.
ev3.speaker.beep()

# Run the motor up to 500 degrees per second. To a target angle of 90 degrees.
test_motor.run_target(500, 90)

# Play another beep sound.
ev3.speaker.beep(frequency=1000, duration=500)
This program makes your robot beep, rotate the motor, and beep again with a higher pitched tone. Run the program to make sure that it works as expected.
Managing files on the EV3 Brick
After you’ve downloaded a project to the EV3 Brick, you can run, delete, or back up programs stored on it using the device browser as shown in Figure 15.

Figure 15 Using the EV3 device browser to manage files on your EV3 Brick
评论:
学完EV3/SPIKE相关课程后接着学什么?
应该有不少给孩子报了EV3/SPIKE兴趣班的家长们,对孩子后面应该学什么是没有明确认知的吧,本文来探讨下后续学什么和怎么学。

Scratch 3.0连接EV3
本文介绍如何在Scratch中对EV3机器人进行开发。
Arduino 高级编程:控制乐高EV3马达
本文介绍一种使用Arduino开发板控制乐高EV3马达的方法。

Java 机器人编程入门手册(四)
在这一章中,你将学习一组传感器,它们被用来执行有根据的动作。
Java 机器人编程入门手册(三)
在本章中,您将学习启发式搜索策略背后的基本思想以及如何实现爬山算法,这是 leJOS EV3 中最典型的启发式方法之一。
Java 机器人编程入门手册(二)
这一章向你介绍了在莱霍斯 EV3 使用的笛卡尔坐标系的基础知识。它还教你如何在导航课程中应用编程方法来控制轮式车辆,以便在二维平面中用坐标描绘出预定义的路径。
Java 机器人编程入门手册(一)
本章提供了如何使用乐高 MindStorm EV3 公司建立 Java 机器人编程环境的分步指南,包括乐高 MindStorm EV3 的基本概述和leJOS-EV3的介绍。
乐高EV3遥控车搭建与编程指南
乐高EV3遥控车:从搭建到编程的全面指南
M5 EV3电机底座
Base X 是一款兼容乐高 EV3 电机的专用底座,可同时接入 4 路(RJ11)乐高电机,支持角度 / 速度的读取和控制,完美兼容原有电机功能。
乐高EV3 Java固件leJOS
leJOS是Lego Mindstorms可编程砖的固件替代品。 该软件的不同变体支持原始机器人发明系统,NXT和EV3。
课程

微信分享
