- Introduction(介绍)
- Sensor(传感器)
- Motor(电机)
- Remote(远程)
- Display(显示)
- Oscilloscope(示波器)
- Sound(声音)
- Statistics(统计)
- Timer(定时器)
- Drawing robot(绘图机器人)
- Morse code(摩斯电码)
- Robot Arm(机械臂)
- Gyro Boy(陀螺男孩)
- Annex(附件)
Robot Arm 机械臂
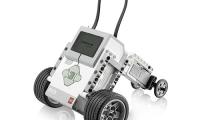
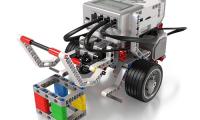
In this chapter we control a robot arm. You can:
在本章中,我们将控制一个机械臂。您可以:
- lift the arm 抬起手臂
- rotate the arm 旋转手臂
- open and close the hand
打开和关闭手牌
You can find the construction guide to build the robot arm here.
您可以找到 构建指南 在此处构建机器人手臂。
Motors and sensors 电机和传感器
When you connect the robot you will see these sensors and motors:
当您连接机器人时,您将看到这些传感器和电机:

A rotation in the clockwise direction has this effect:
顺时针方向旋转具有以下效果:
- motor A : opens the hand
电机 A : 张开手 - motor B : lowers the arm
电机 B : 降低手臂 - motor C : turns the arm clock-wise
电机 C : 顺时针转动手臂
The two sensors serve to detect the range limit of the arm.
两个传感器用于检测手臂的范围限制。
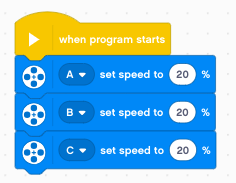
The first thing we will do is to set the speed of the 3 motors to 20%.
我们要做的第一件事是将 3 个电机的速度设置为 20%。
Lift the arm 抬起手臂
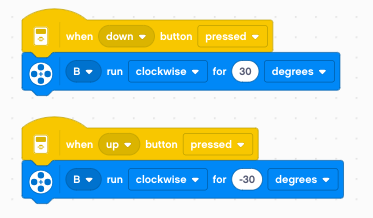
We program the up/down buttons to move the motor B by 30° increments.
我们对向上/向下按钮进行编程,以 30° 的增量移动电机 B。
Rotate the arm 旋转手臂
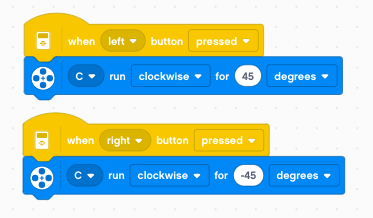
We program the left/right buttons to move the motor C by 45° increments.
我们对左/右按钮进行编程,以 45° 的增量移动电机 C。
Move continously 连续移动
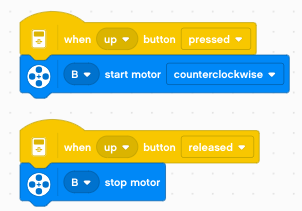
Now we change the program. We move the motor as long as we press the button. For this we use two events:
现在我们更改程序。只要我们按下按钮,我们就会移动电机。为此,我们使用两个事件:
- the pressed event
Pressed 事件 - the released event
已发布事件
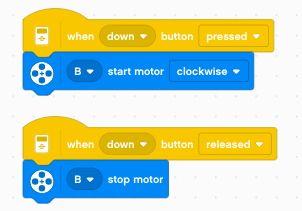
And for the other direction
而对于另一个方向
Limit the lift 限制提升
In order to calibrate the robot, two sensors are attached to the robot:
为了校准机器人,机器人上安装了两个传感器:
- the light sensor detects the upper limit of the arm,
光传感器检测手臂的上限, - the touch sensor detects the rotational limit of the arm.
触摸传感器检测手臂的旋转极限。
Move the motor upwards and look at the light value. It will go from 5% up to 30%.
向上移动电机并查看光照值。它将从 5% 增加到 30%。
Let’s program the center button to start the calibaration movement. We move the arm up until the reflected light intensitiy is larger then 25%. Then we stop the motor and play a short beep.
让我们对中心按钮进行编程以启动校准运动。我们向上移动臂,直到反射光强度大于 25%。然后我们停止电机并发出一声短促的哔哔声。
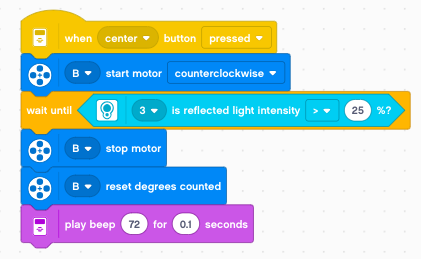
We also reset the rotation sensor, so that this upper value becomes 0°. So when the robot is calibrated, we always can know its absolute angles.
我们还重置了旋转传感器,使这个上限值变为 0°。因此,当机器人进行校准时,我们总是可以知道它的绝对角度。
You can lower the arm now and find the angular postion when the arm touches the table. It should be close to 280°.
您现在可以降低手臂,并在手臂接触桌子时找到角度位置。它应该接近 280°。
You can download this program: arm2.lmsp
您可以下载此程序: arm2.lmsp 的
Limit the rotation 限制旋转
Again, let’s program the arm that it moves as long a button is pressed. For this we use these two events:
同样,让我们对臂进行编程,只要按下按钮,它就会移动。为此,我们使用以下两个事件:
- the button pressed event
按钮按下事件 - the button released event
按钮已发布事件
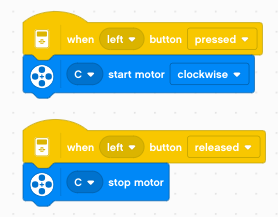
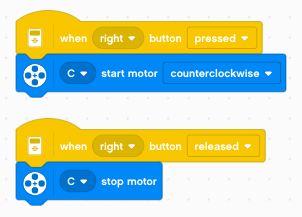
And do it also the other way.
反之亦然。
Move the arm slowly to the left and try to find the position where the touch sensor detects the limit position. It’s when the arm faces completely backwards. Like before, we program the center to go automatically to that position.
将臂缓慢向左移动,并尝试找到触摸传感器检测到极限位置的位置。这是手臂完全向后的时候。和以前一样,我们对中心进行编程,使其自动移动到该位置。
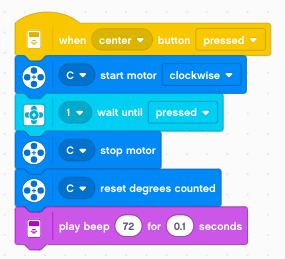
When the limit position is detected, we sound a short beep and reset the rotation sensor. This position becomes the new zero.
当检测到极限位置时,我们会发出一声短促的哔哔声并重置旋转传感器。此位置将成为新的零。
Now move the arm manually to the front position. The sensor position should be about -600°.
现在手动将机械臂移动到前位置。传感器位置应约为 -600°。
Display current position
显示当前位置
It’s quite useful to display sensor information directly on the brick. Of course now we can see the sensor values on the computer, but the brick can also run without a computer being attached.
直接在 brick 上显示传感器信息非常有用。当然,现在我们可以在计算机上看到传感器值,但砖块也可以在没有连接计算机的情况下运行。
In order to display the current sensor values, we use the when program starts event to start a forever loop. Inside this loop we write the sensor value to the screen.
为了显示当前传感器值,我们使用 when program starts 事件来启动 forever 循环。在这个循环中,我们将传感器值写入屏幕。
In order to see it well, we place it at position (30, 30) and we select a large black font.
为了看得清楚,我们把它放在位置 (30, 30) 并选择了一个大的黑色字体。

Go to a random position
转到随机位置
Now that we have calibrated the rotation and established it’s allowd range, we can control the arm. Any value in the range [0 .. -600] is allowd.
现在我们已经校准了旋转并确定了它允许的范围,我们可以控制手臂了。允许 [0 .. -600] 范围内的任何值。
We can use the pick random function to get such a value. In order to know the distance the motor has to move we calculate the difference target - current.
我们可以使用 pick random 函数来获得这样的值。 为了知道电机必须移动的距离,我们计算了差异 目标 - 当前 。

We mark the beginning and end of this random move with two different sounds.
我们用两种不同的声音来标记这个随机移动的开始和结束。
You can download this program: arm3.lmsp
您可以下载此程序: arm3.lmsp 文件
Create a calibrate function
创建校准函数
Now it’s time to define our first function. The calibration needs to be done each time at the beginning of the progam. Let’s define a function and execute it automatically at start.
现在是时候定义我们的第一个函数了。每次都需要在 progam 开始时进行校准。让我们定义一个函数并在启动时自动执行它。
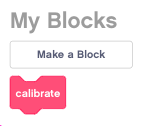
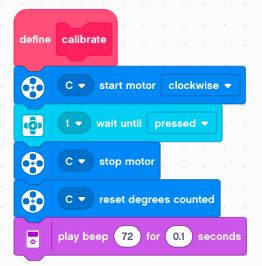
Create a new My Block and define it like this:
创建一个新的 My Block 并像这样定义它:
Record arm positions 记录手臂位置
An industrial robot needs to go to specific positions. It must remember these positions. We are going to program the arm so that it can memorize positions.
工业机器人需要前往特定位置。它必须记住这些位置。我们将对手臂进行编程,使其能够记住位置。
We make a new variable n
我们创建一个新变量 n
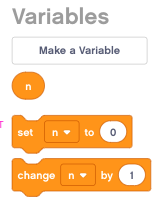
This variable will be used to count each memorized position. In the start event we set the variable n to 0.
此变量将用于计算每个记忆的位置。在 start 事件中,我们将变量 n 设置为 0。
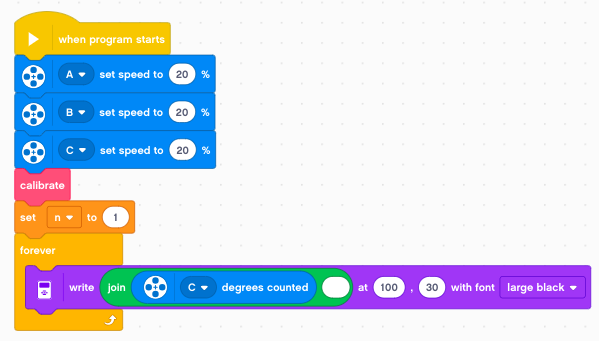
We place all the commands which need to be done once at the beginning. Then we enter a forever loop to repeatedly display the current sensor position.
我们将所有需要执行一次的命令放在开头。然后我们进入一个 forever 循环,重复显示当前传感器位置。
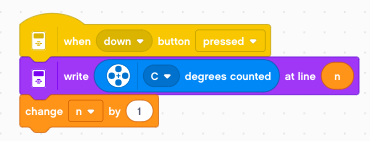
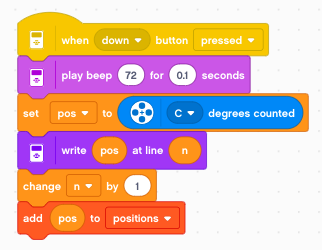
Then we create a button down event which does:
然后我们创建一个 button down 事件,该事件执行以下作:
- write the current sensor value to line n on the screen
将当前传感器值写入屏幕上的第 n 行 - increment the variable n by 1
将变量 n 增加 1
After calibration has finished, move the arm with the left/right button. Then press the down button to write the current position to the screen. You will get something like this:
校准完成后,使用左/右按钮移动机械臂。然后按向下按钮将当前位置写入屏幕。你会得到这样的结果:
-234
-345
-435
-534
Saving values in a list
在列表中保存值
So far these values have just been written to the screen. They are not registered in any list.
到目前为止,这些值刚刚写入屏幕。他们没有在任何列表中注册。
Create a new list called positions.
创建一个名为 positions 的新列表。
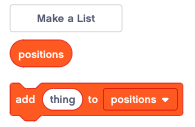
Now we have to change the button down event to save the current position in the list.
现在我们必须更改 button down 事件以保存列表中的当前位置。
Replaying the list 重播列表
Now we are ready to program the replay function. We use the center button event.
现在我们准备好对 replay 函数进行编程了。我们使用 center 按钮事件。
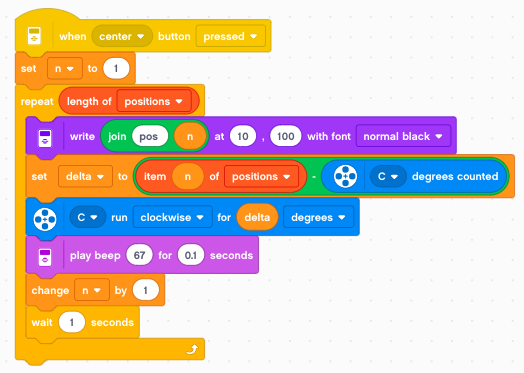
We reset the variable n to 1, to point to the first element in the list. Then we enter a loop which will repeat the number of times there are elements in the list.
我们将变量 n 重置为 1,以指向列表中的第一个元素。然后我们进入一个循环,该循环将重复列表中元素的次数。
Inside the loop we: 在循环中,我们:
- display the current item number (pos 1, 2, 3, …)
显示当前商品编号(位置 1、2、3 等) - calculate the delta value the arm has to move
计算手臂必须移动的 delta 值 - move the arm to the new position
将机械臂移动到新位置 - play a beep 播放哔哔声
- increment the variable n by 1
将变量 n 增加 1 - wait for 1 second 等待 1 秒
Reset the list 重置列表
At the end of the replay the variable n will be pointing at the next possible position. It is possible to add more values to the list. At any time you can replay the list.
在重播结束时,变量 n 将指向下一个可能的位置。可以向列表中添加更多值。您可以随时重播该列表。
In order to reset the list we use the up button.
为了重置列表,我们使用向上按钮。
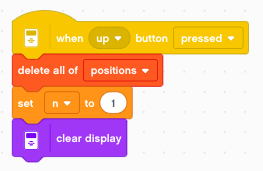
It does: 它确实:
- delete the list 删除列表
- reset the variable n to position 1
将变量 N 重置为位置 1 - clear the display 清除显示
You can download this program: arm4.lmsp
您可以下载此程序: arm4.lmsp 文件
Open and close the hand
打开和关闭手形
To operate the hand we control motor A. This motor does not have a limit sensor. We use a little trick to find the end position. We close the hand for about half a second. Once the hand is closed, the motor cannot move any further and it will stop shortly after. This gives a defined state. From there we can go 90° the other way, to open the hand.
为了操作手,我们控制电机 A。该电机没有限位传感器。我们用一个小技巧来找到结束位置。我们合上手大约半秒钟。一旦指针闭合,电机就不能再移动了,很快就会停止。这将给出一个定义的状态。从那里我们可以向另一个方向走 90°,打开手牌。
- closing for 0.5 secondes (time mode)
合闸 0.5 秒(时间模式) - opening 90° (rotation mode)
打开 90°(旋转模式)
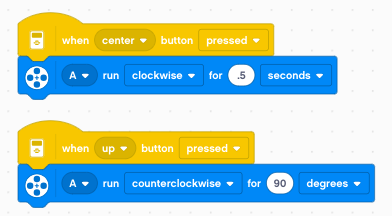
You can try to put an object between the claws and close the hand. The object will be firmly held.
您可以尝试在爪子之间放置一个物体并合上手。物体将被牢牢握住。
Remember the state 记住状态
Since we only have 5 buttons, it would be convenient to use just one button to operate the hand. This button could be used to toggle between the two states:
由于我们只有 5 个按钮,因此只使用一个按钮来作手会很方便。此按钮可用于在两种状态之间切换:
- open 打开
- closed 闭
We use a variable hand to keep this two states as a string. We define the hand to be closed at the start of the program.
我们使用 variable hand 将这两个状态保存为字符串。我们定义在程序开始时要平仓的手牌。
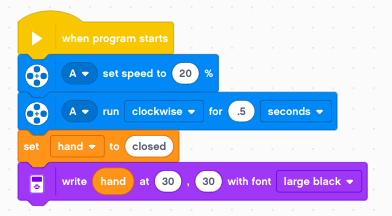
Based on the state of the variable hand we open the hand if it’s closed and close it if its open.
根据可变手牌的状态,如果手牌关闭,则打开手牌,如果打开,则关闭手牌。
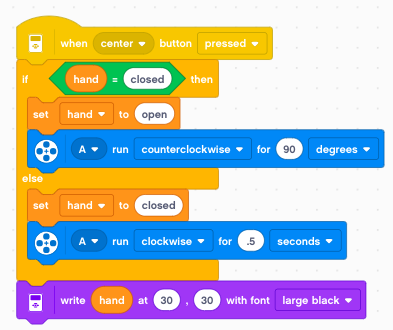
Inside the if-else block the state of the variable is inverted. At the end, the current state of the hand is printed to the screen in large letters.
在 if-else 块中,变量的状态是反转的。最后,手的当前状态以大写字母打印到屏幕上。
You can download this program: arm5.lmsp
您可以下载此程序: arm5.lmsp
 图形化编程
图形化编程
